


Finnweave is a double-layer fabric, where the top and the bottom layer are changing their positions during the pattern: the bottom layer rises and the top layer goes under the bottom layer at the same spot. Both sides of a finnweave fabric can be used as a face side.
Pattern
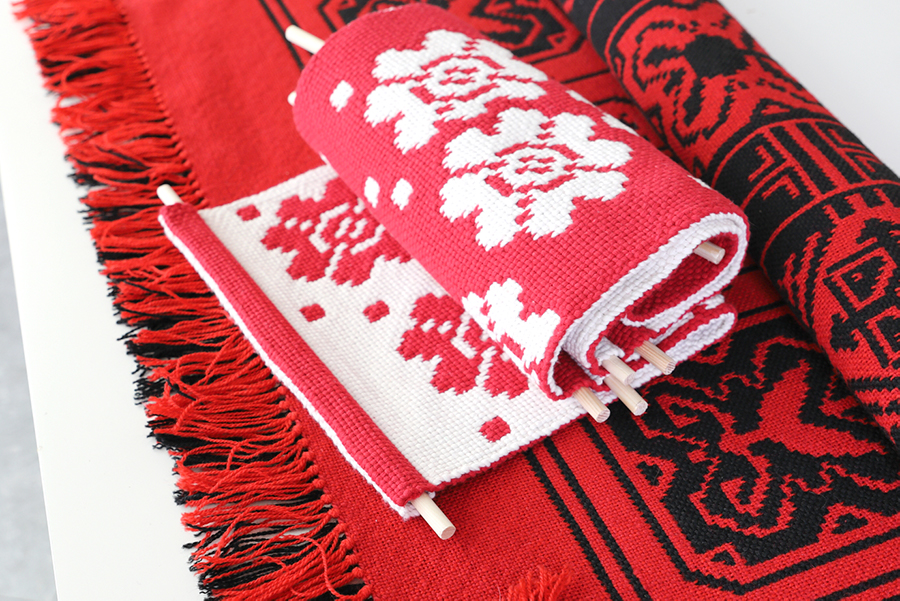
Typically a finnweave is double-coloured. A solid-coloured pattern is picked up on top of a background with another colour. It is also possible to combine more different colours and materials to a finnweave fabric. The pattern of the finnweave is drawn to a graph paper and is followed by counting the threads. The pattern can also be drawn to a transparent plastic that is attached on top of the fabric with pins.
Structure and material
The structure is commonly plain weave in both layers. The warp yarn is usually the same in both layers, and usually also the weft. Besides the traditional wool, every other material can theoretically be used, as long as the durability of the yarn is sufficient. The finnweave technique is wearing the warp yarns more than usual. The warp is dense, the pick-up is stretching and wearing the threads and the same spot is being worked on a lot.
If the warp material is the same in both layers, the ratio of the warp ends is usually 1:1, which means that there is one warp end on the bottom layer corresponding to one warp end on the top layer. The ends are threaded alternating an end of a bottom and a top layer. When weaving, there’s usually two picks woven consecutively to the top layer and two picks to the bottom layer, which means that the ratio of the wefts is 2:2. If you choose to use yarns that differ from strength, you can decide on the ratio according to the yarns. It can be for example 1:2 or 2:1.
Warp
When calculating the sett, combine the ends of the bottom layer to the ends of the top layer. For example 4 ends/cm + 4 ends/cm = 8 ends/cm. In finnweave, where both layers are plain weave, and the warp ratio is 1:1, has a 4-shaft straight threading alternating a top and a bottom layer end. A shaft contains only the same layer ends. The sett in a layer in a patterned double weave is determined usually slightly looser than the material would require as a single layer fabric. Pick-up patterns make the layers swap their places, which tightens the fabric. The sett of the warp and the weft needs to be the same so that the pattern will have the correct shape. Too many picks per cm will flatten the pattern, and too few will elongate the pattern disproportionately.
Tie-up
The tie-up is special in finnweave. Besides the risers and sinkers implicated by black and white squares, there are squares marked with a dot. In these spots, the treadle is left untied to the lamms, so there won’t be any cords either.
Weaving equipment
For the weaving, you need two pick-up sticks that need to be at least 20 cm longer than the width of the fabric. You will also need two shuttles: one for the top layer and one for the bottom layer.

This is how you weave Finnweave
WEAVING PLAIN BACKGROUND
(NO PATTERN)
DOUBLE WEAVE PICK-UP – FINNWEAVE
The weave structure in the top and the botton leyer is plain weave
Warp ratio 1:1
Weft ratio 2:2

1. Press down the 1. treadle. Attach the pick-up stick to the shed behind the beater. The top layer is white, and the bottom layer is red. *The layers can also be woven in the opposite way if needed (red layer on top and white on bottom).

2. Press the 3. treadle and weave a white pick to the top layer.

3. Press down the 4. treadle and weave another white pick to the top layer.

4. Press the 5. treadle and weave a red pick to the bottom layer.

5. Press down the 6. treadle and weave another red pick to the bottom layer.

This is how you weave Finnweave
WEAVING PATTERN
STEP ONE:
Pick-up the pattern, weave the picks of the background
1 square corresponds 2 + 2 ends and 2 + 2 picks = 1 unit.
There is 42 units in the width of the fabric (168 ends : 4 = 42).
Red square = Pattern
White square = Background

The weave structure in the top and the botton leyer is plain weave
Warp ratio 1:1 (alternating the top and the bottona leyer end)
Warp ratio 2:2 (two picks woven consecutively to the top layer and two picks to the botton leyer)
The colour order in the warp from right to left is red, white, red, white, and so on.

1. Press down the 2. treadle. Pick up the pattern from the raised ends on top of the pick-up stick by following the graph pattern (1 red square corresponds to 2 red ends). Release the treadle. *The layers could be the opposite way if needed. See end of the instructions.

2. Transfer the pattern behind the beater by slipping another pick-up stick under the elevated threads behind the beater. Remove then the stick in front of the beater.

3. Press down the 1. treadle and attach a stick behind the beater in a shed formed under the intersection of the threads. Release the treadle and push the sticks near the shafts.

4. Press down the 3. treadle and weave a pick to the background

5. Press down the 4. treadle and weave another pick to the background.
Leave the pick-up sticks in place for the next step.

STEP TWO:
Pick up the background, weave the picks of the pattern

6. Press down the 1. treadle and remove the lower pick-up stick. Keep on pressing the 1. treadle and pick up the background from the raised ends between the shafts and the stick. *The layers could be the opposite way if needed. See end of the instructions.

7. Remove the stick closer to the reed.

8. Press the 2. treadle and attach the stick
in a shed formed under the intersection of the threads. Release the treadle and push the sticks near the shafts.

9. Press down the 5. treadle and weave a pick to the pattern.

10. Press down the 6. treadle and weave another pick to the pattern.

Remove the sticks and repeat steps one and two.
If the pattern is white and the background is red
Start step one by pressing down the 1. treadle, when the white ends are raising. Pick up the pattern from the white ends. In step two, press down the 2. treadle and pick up the background from the red ends.
Don’t pick up the first end on the right side of each pattern

Make precise edges of the pattern in finnweave
When you are doing the pick-up, you must pay attention to the edges of the patterns!
STEP TWO picture 6.
When you are picking up the background (STEP TWO, picture 6.) don’t pick up the first background end after the pattern = either the pair of the last pattern end, or the end before the pattern = the pair of the first pattern end. It depends on the order of the top and the bottom layer, which method is used.
The colour order in the warp from right to left is red, white, red, white, and so on. Each unit for pick-up or square in the graph pattern corresponds on a loom from right to left a red, a white, a red and a white end. These threads are supposed to be kept together.
If the pattern is red and the background is white, don’t pick up the first white background end after the red pattern. It belongs to the pattern.

If the pattern is white and the background is red, don’t pick up the first red background end after the white pattern. It belongs to the pattern.

Watch a new video on our Youtube channel!