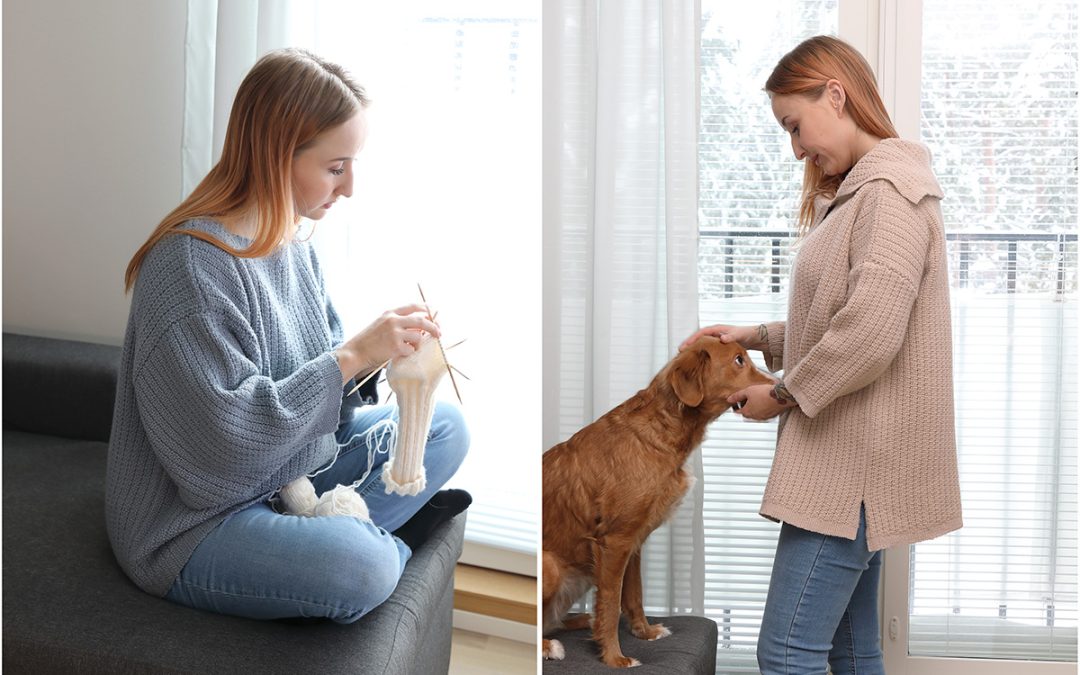
We visualized two patterns of sweaters woven on looms. For one sweater we wound a wide warp on which we wove sleeves side by side. On another narrower warp, we weaved the sleeves one by one. With the dimensions of the instructions, the size of the sweater is from 38 to 42, but you can easily change the size of the pieces.
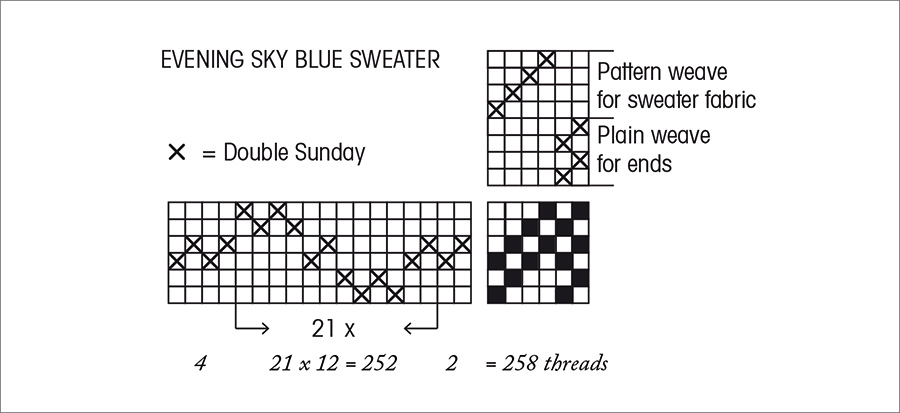
| EVENING SKY BLUE SWEATER | |
| The warp | Double Sunday, DK-weight Merino Wool |
| Warp | width 73,7 cm the sett 3,5 threads/cm number of warp ends 258 |
| length | 4,3 m |
| Reed | 1 per dent in a 35-number reed, metric = 35/1 |
| Structure | Cord |
| AMOUNT OF YARN NEEDED Double Sunday, 108 m = 50 g, Sandnes Garn DK-weight non-superwash Merino Wool yarn 6051 Evening sky (Kveldshimmel) warp 477 g weft 460 g |
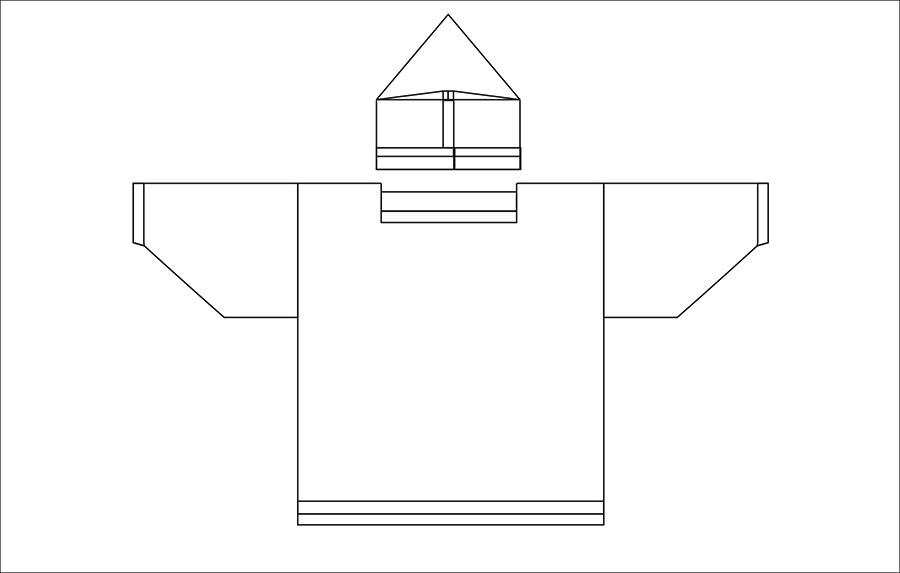
| LIGHT BROWN SWEATER | |
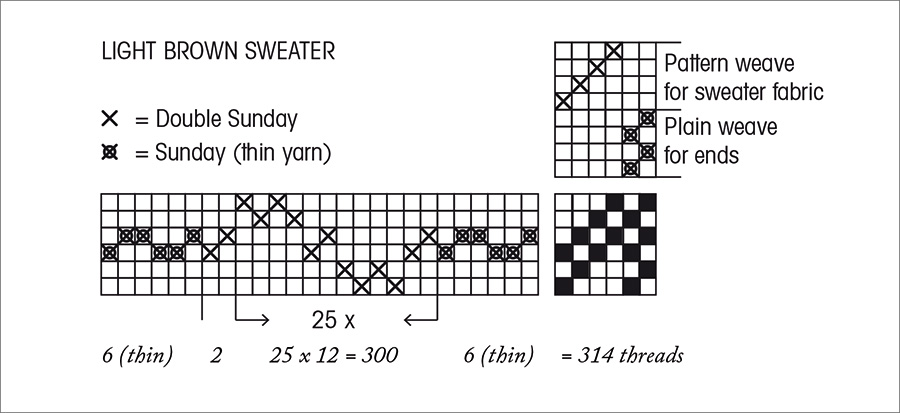
| The warp | Double Sunday, DK-weight Merino Wool and warp edges Sunday, Fingering weight Merino Wool |
| Warp | width 89,7 cm the sett 3,5 threads/cm number of warp ends 314 |
| Length | 3,3 m |
| Reed | 1 per dent in a 35-number reed, metric = 35/ |
| Structure | Cord |
|
AMOUNT OF YARN NEEDED Sunday, 203 m = 50 g, Sandnes Garn INSTRUCTIONS FOR WINDING THE WARP |
Weaving instructions for both sweaters
The cloth will draw up from its woven width already on looms. Weave a 5 cm pattern structure of weft yarn or similar thread to get the right width to the cloth. After that start weaving the ends with the plain weave. Use the stretcher and adjust it to the same width as the warp in the reed.
The shirttails, necklines, armholes, and collar edges of the blouse are finished by threading back the warp ends into the woven fabric. Therefore, 6 cm per 1 end must be left at the ends of these pieces for this finishing.
Weave this finishing allowance with a removable scrap yarn, similar to the weft.
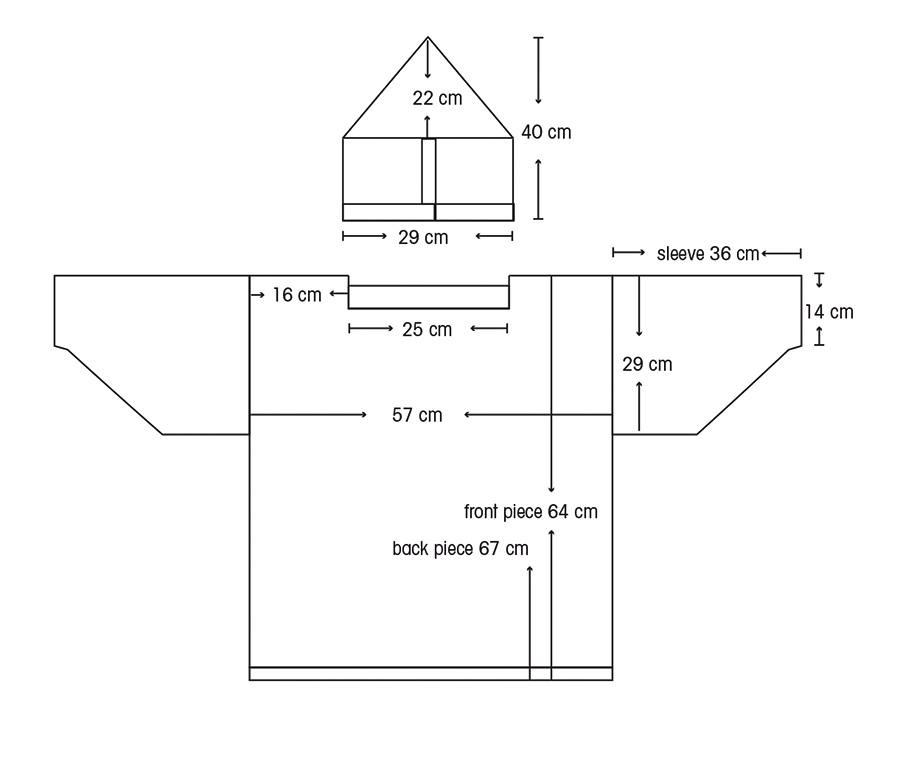
The shoulders and sleeve heads are finished with a straight machine stitch, so there is no need to leave any finishing allowance. See drawings.
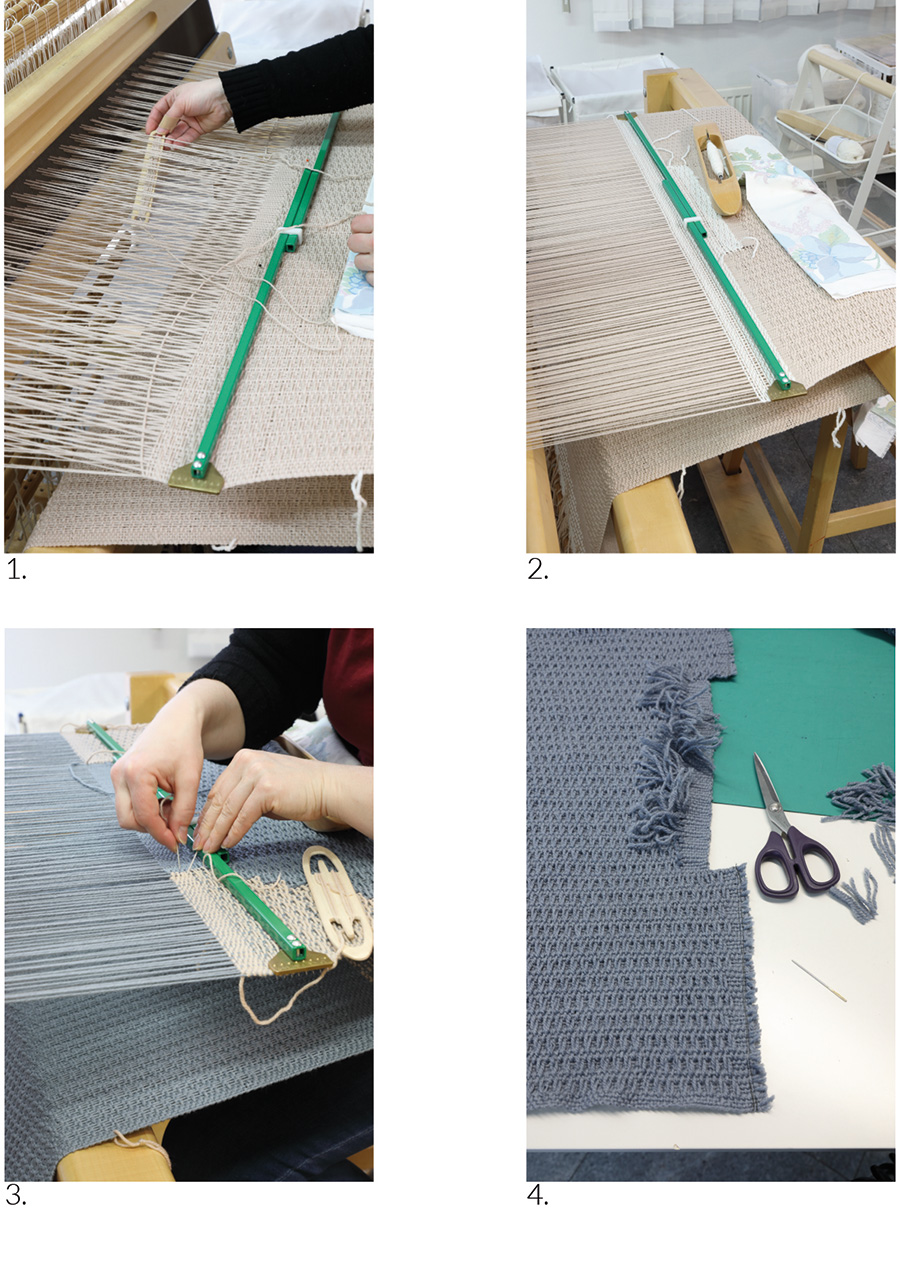
The structure is plain weave on hemlines, neckline edges and armholes. – Picture 1.
The neckline opening and narrowed areas at the sleeves are woven with an extra scrap yarn to be removed. – Picture 2.
Use the same yarn or similar yarn as the fabric. The opening between the fabric and the extra woven part is closed with sewn stitches as the weaving progresses. The stretcher can then be used normally, and the pieces will be in the correct shape. – Picture 3.
The shape of the shoulders and the neckline. – Picture 4.
Continue the weft on the edge of the warp, not on the center. Split half the yarn tail and cut off one half. Carefully overlap the thinned tails and beat the weft in. Alternatively, at the edges of the seams, leave the ends of the wefts outside the edge of the warp. When finishing, thread the ends to the seam.
Finishing for both sweaters
SHOULDERS AND UPPER EDGES OF THE SLEEVES
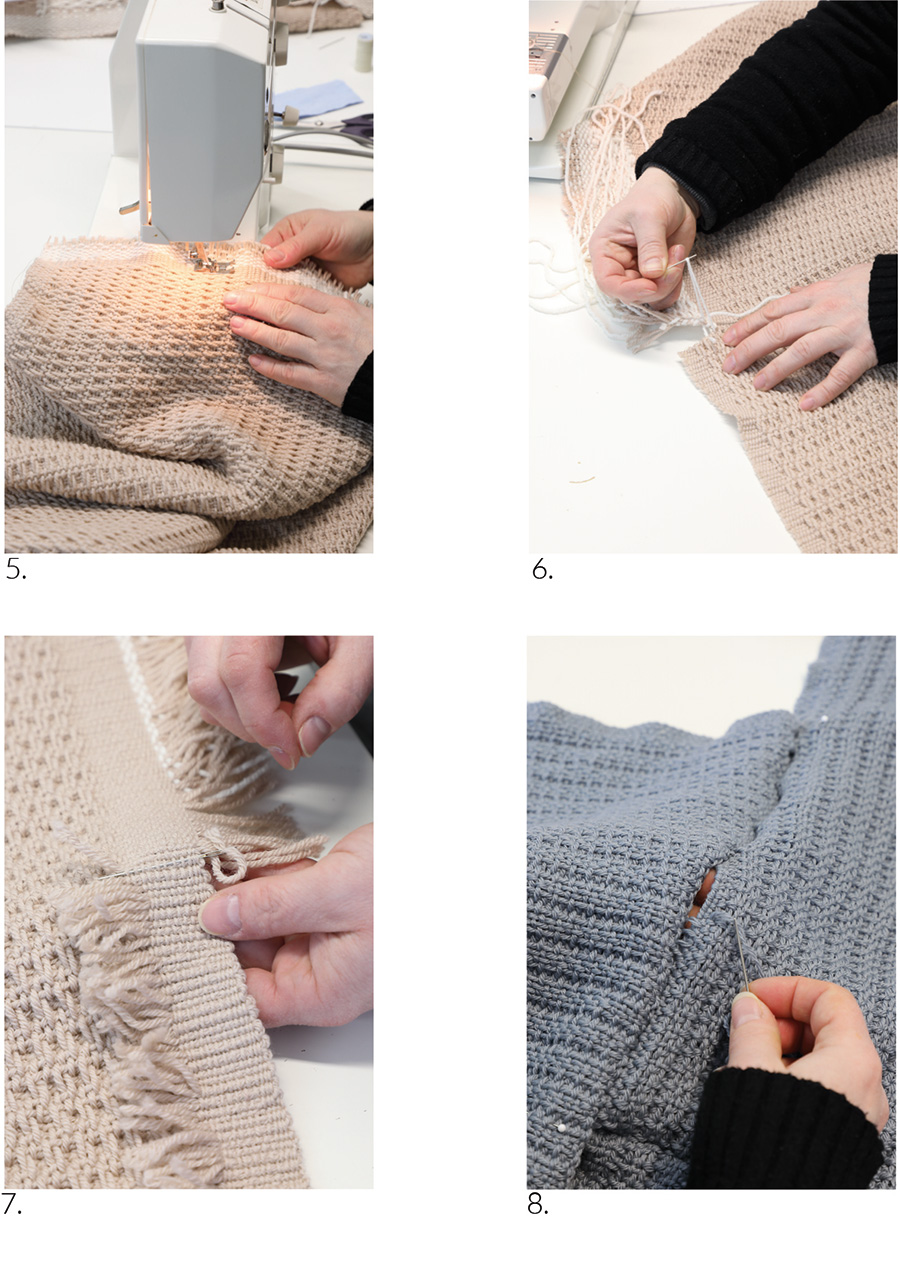
Machine sew a straight stitch twice over the shoulders of the front and back pieces and at the top of the sleeves before cutting the pieces apart. – Picture 5.
Unravel the stitches joining the pieces. – Picture 6.
TAILS, NECLINE, AND COLLAR EDGES
Use a blunt point needle for the threading. Unravel the extra weft at the bottom edges of the front and back pieces and thread the warp threads back into the fabric up to the top of the end woven with tabby treadles. Don’t tie the knots! – Picture 7.
In the same way, thread the neck openings and armholes of the sleeves. Thread on the back side of the fabric. Carefully cut off the thread tails. Also thread the warp ends of the decreased edges of the sleeves back into the fabric so that the edge binds. Thread along the edge so that the threads remain in the seams. Alternatively, you can machine sew two straight stitch lines on the edge. First tie the warp threads 1 + 1 with overhand knots. Turn the warp tails over the fabric and sew them on the fabric lightly by hand. After the machine stitch, carefully cut off the warp tails and remove the supporting stitches.
ASSEMBLING THE SWEATERS
Sew a light brown sweater with a thin Sunday yarn and a blue sweater with two strands of the Double Sunday yarn. Pin the edges of the pieces right side facing. The seam will be neat if the stitches are on the plain weave sections, not in the patterned fabric. – Picture 8.
Sew the shoulder seams of the front and back pieces. Face the shoulder seam and the middle of the sleeve head and pin. Pin and sew the sleeve in its place. Sew side seams. Leave a slit of about 5 cm in the light brown blouse. The seam of the blue blouse is sewn all the way down. The back piece is longer than the front piece. Sew the sleeve seams.
Light brown sweater: Fit the collar piece inside the neckline opening the plain weave sections facing and pin. The opening in the collar is on the left side approx. 3 – 5 cm from the shoulder seam. Gather the collar fabric at the corners of the neckline. Tack in place. Sew the lower edge of the collar to the neckline. Evening sky lue blouse: The collar piece is sewn with the hood. The hood is not attached to the sweater.
Wet-finish the sweater and place on a level to dry, e.g., on a towel. Handle the fabric with care! The sweater stretches at first but bulls back into the right shape when it dries

Weaving instructions for the light brown sweater
Start and finish the pieces by weaving plain weave with the thinner thread, see drawing on the right. Weave the sweater fabric with the thicker thread according to the treadling order. The density of the plain weave is 8 picks/cm, and the pattern fabric has a density of 4.5 picks/cm. We measured the fabric slightly loosened.
Neckline: 16 vertical pattern stripes (8 x repeat of the threading) = shoulder – 18 pcs (9 x repeat) = centre – 16 vertical stripes (8 x repeat) = shoulder. Weave the neckline section with three shuttles or sticks. Weave the shoulders with thick yarn and pattern structure, and neckline edge at the centre with thin yarn using plain weave. Due to the different density, weave 1 throw at the shoulders and 2 throws to the neckline end at the same row. Twist the wefts together when they meet at the middle of the fabric.
Opening of the neckline: Weave the opening at the centre with scrap yarn and shoulders with the thicker yarn. Do not twist the threads with each other.
Sleeves: The sleeves are woven side by side. Weave with two shuttles, do not twist the wefts around each other. Sew the opening shut between the sleeves with a needle while the work progresses. Weave the area outside of the sleeve fabrics with a scrap yarn, do not twist the wefts around each other.
Make a narrowing width of one vertical pattern stripe at the intervals of the throws marked on the drawing. First 4 throws one vertical pattern stripe (a half repeat of the threading) woven with scrap weft and then 8 and 8. See the drawing.
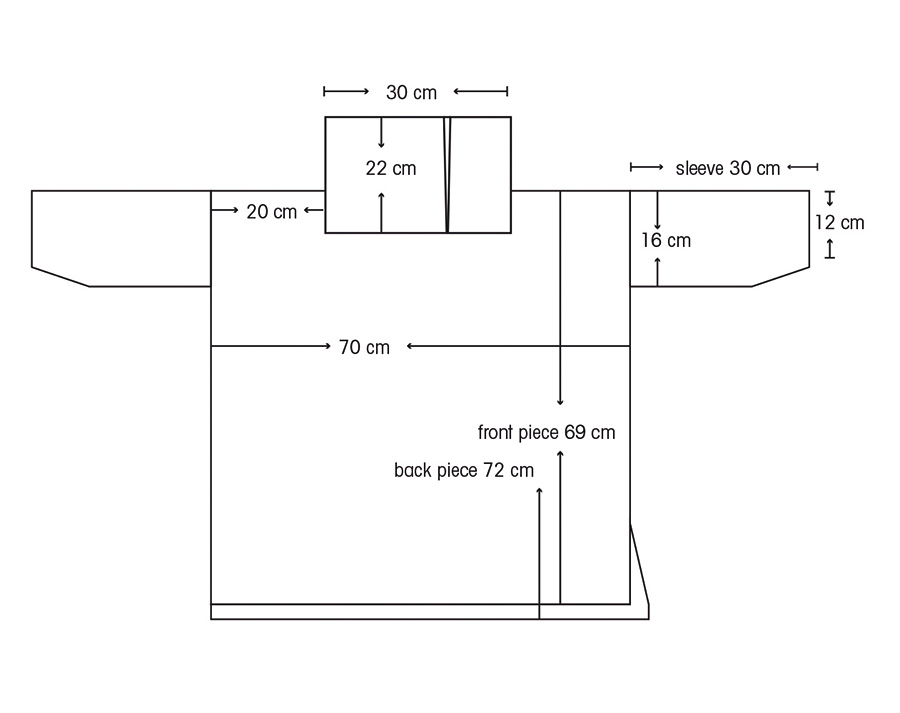

Weaving instructions for the blue sweater
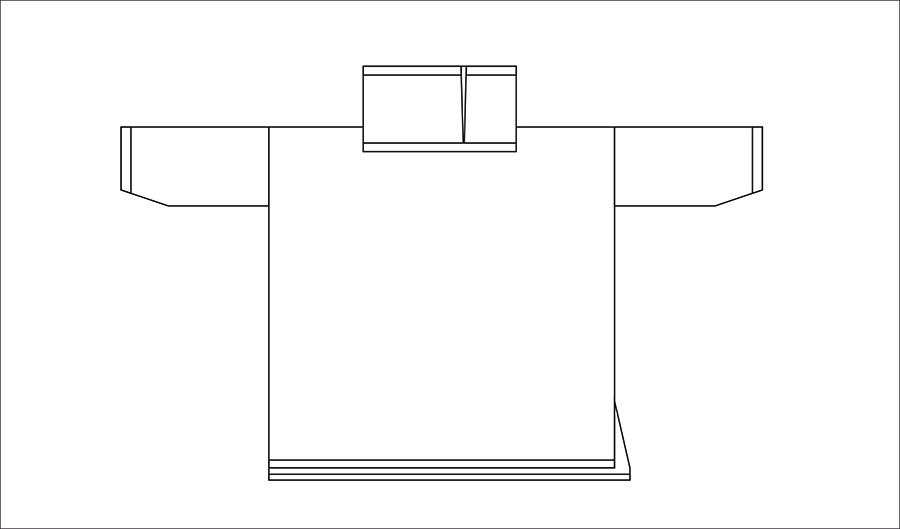
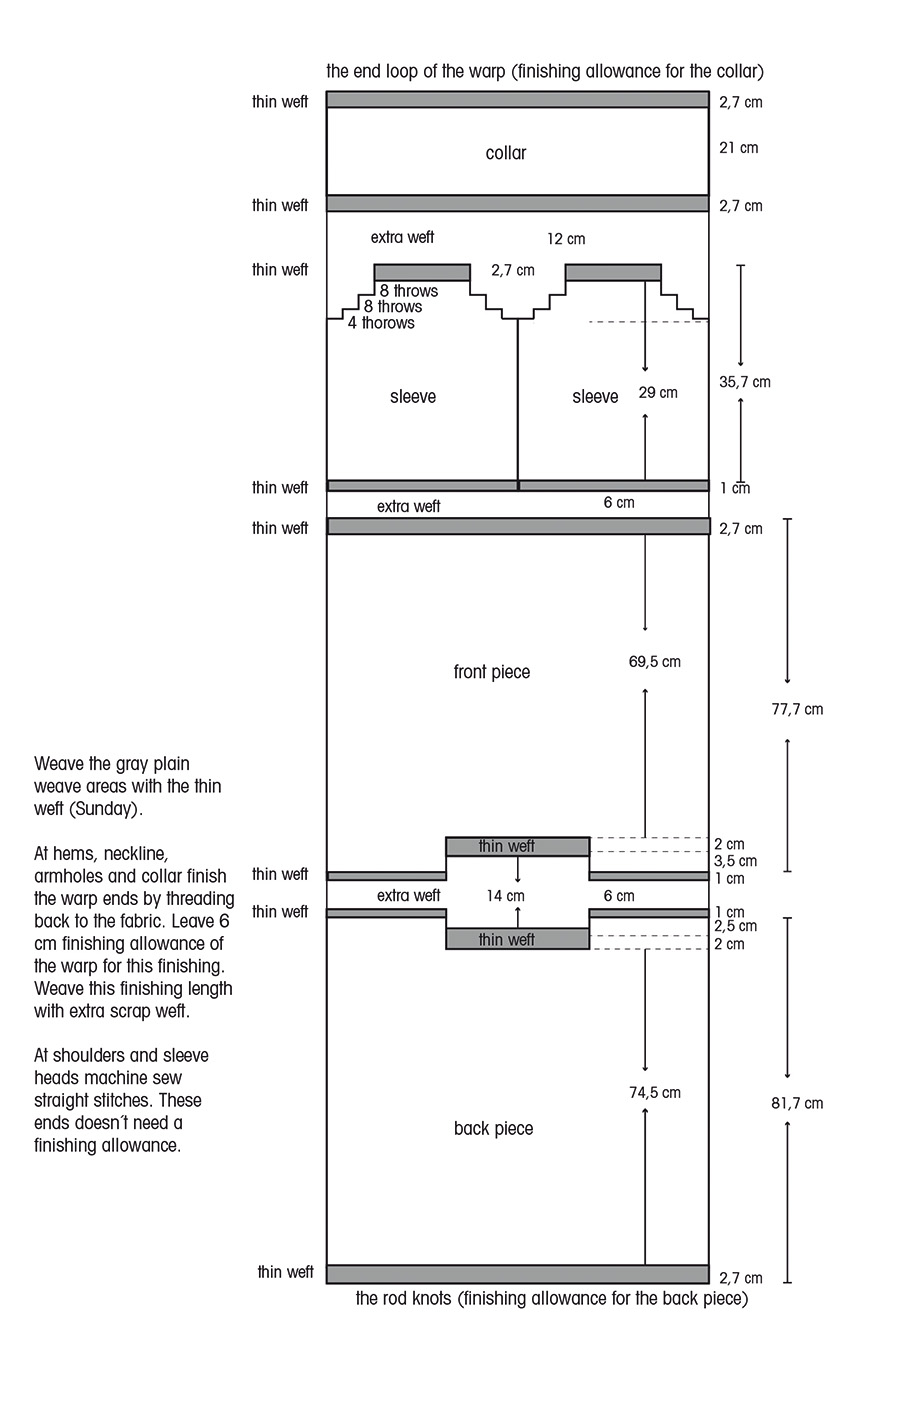
Start and finish the pieces by weaving plain weave with the thinner thread, see drawing on the next page. Weave the sweater fabric according to the treadling instructions. The density is 4,5 picks/cm.
We measured the fabric slightly loosened.
Neckline opening
12 vertical pattern stripe (6 x repeat of the threading) = shoulder – 18 vertical stripe (9 x repeat) = neckline edge
– 12 vertical stripe (6 x repeat) = shoulder.
Weave the neckline with one shuttle: Press the pattern treadle down and throw the shuttle in the shed but lift out from the shed already at the edge of the neckline. Press the plain weave treadle down and insert the shuttle back into the shed and lift out at the other edge of the neckline. Press again the pattern treadle down and insert the shuttle back into the shed and out from the other edge of the warp. Weave 3 cm plain weave to the neckline opening edge.
After that continue with three shuttles or sticks: 1. shuttle for the shoulder, 2. shuttle for the neckline opening with scrap yarn and 3. shuttle for the shoulder. Don’t twist the wefts with each other. Close the opening between the fabric and the extra woven area by sewing as the weaving progresses. This help you to use the stretcher normally and the pieces will be in the correct shape. See the drawing on the next page.
Sleeves
The sleeves are woven sequentially. Weave 25 cm and after that start a narrowing at both edges. Make a narrowing width of one vertical pattern stripe (a half repeat of the threading) at the intervals of 6 throws. Weave the area outside of the sleeve fabrics with a scrap yarn, do not twist the wefts around each other. Make 10 times narrowing on both edges. Weave 3 cm of plain weave after that for the armhole end.
We finished the sleeves narrowing in two different ways. 1. Tie the warp ends together and thread back to the edge of the fabric. 2. Tie the warp ends together, turn the threads over the fabric and sew a straight stitch on edge of the fabric. Cut out the thread tails. Both ways work fine.
Narrower sleeves can be reached by narrowing the warp. Take out warp ends from the work from both edges. Then leave the sleeves to the last pieces of the warp.
Hood, not attached to the sweater
Weave the collar and hood according to the drawing on the next page. Thread the warp ends back to the edge woven with plain weave. Sew the top of the hood the right sides against each other. Fold the edges of the seams inside and sew closed. Turn 5 cm of the front edge on the right side of the hood and sew the section of the seam to the hood. Fold the collar piece twice and place the hood between the fabrics. Gather the hood fabric to make it three centimetres narrower than the collar. Sew by inserting the needle through all the pieces. Attach the buttons to the other edge of the collar on the inside and crochet the fastening loops on the other edge. The edges of the collar overlaps.
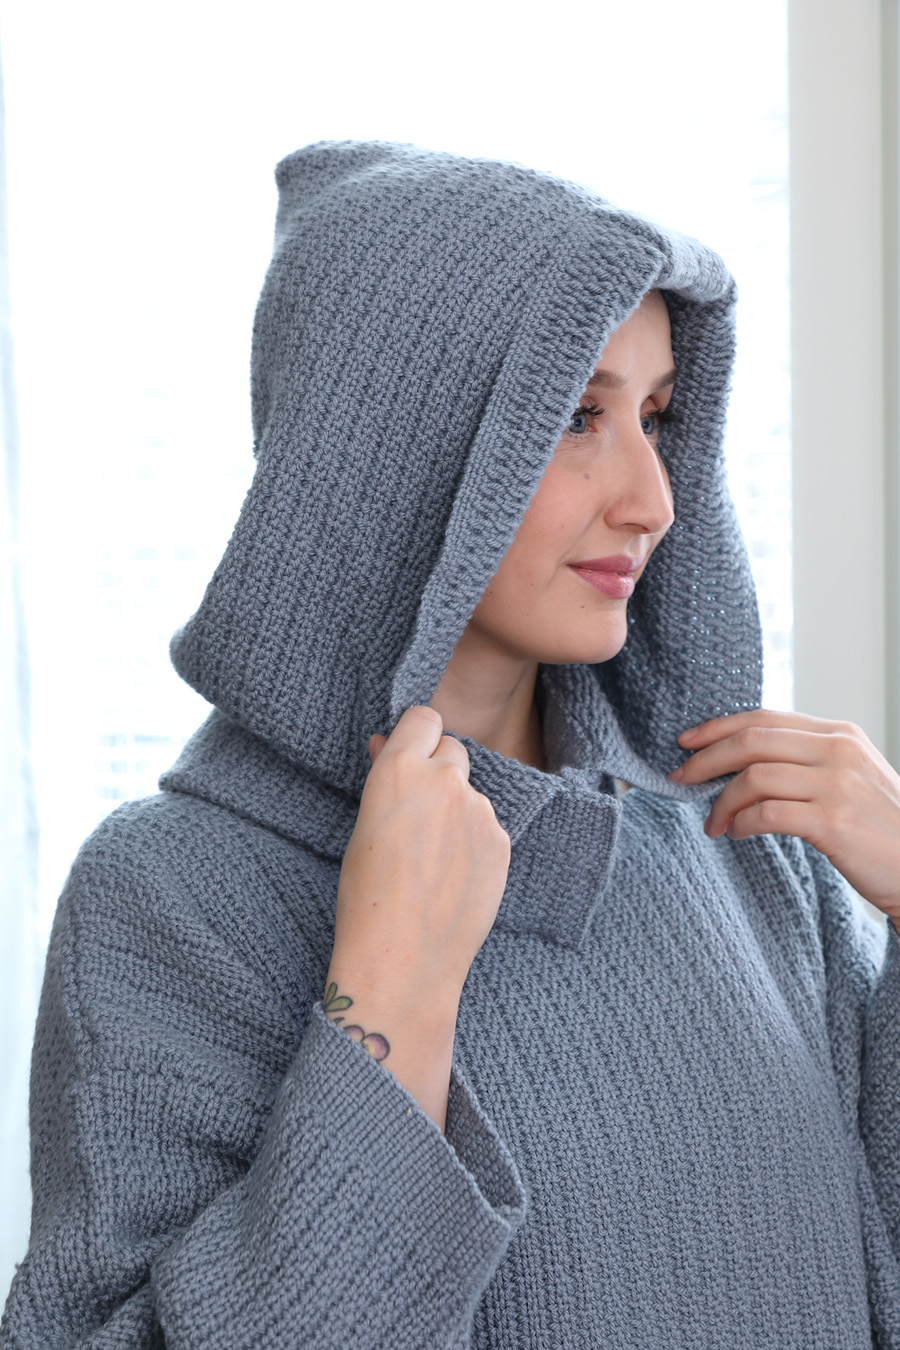
The hood is sewn inside the twice folded collar piece. Buttons and crocheted fastening loops are hidden inside the collar edges. The hood is not fastened to the sweater.
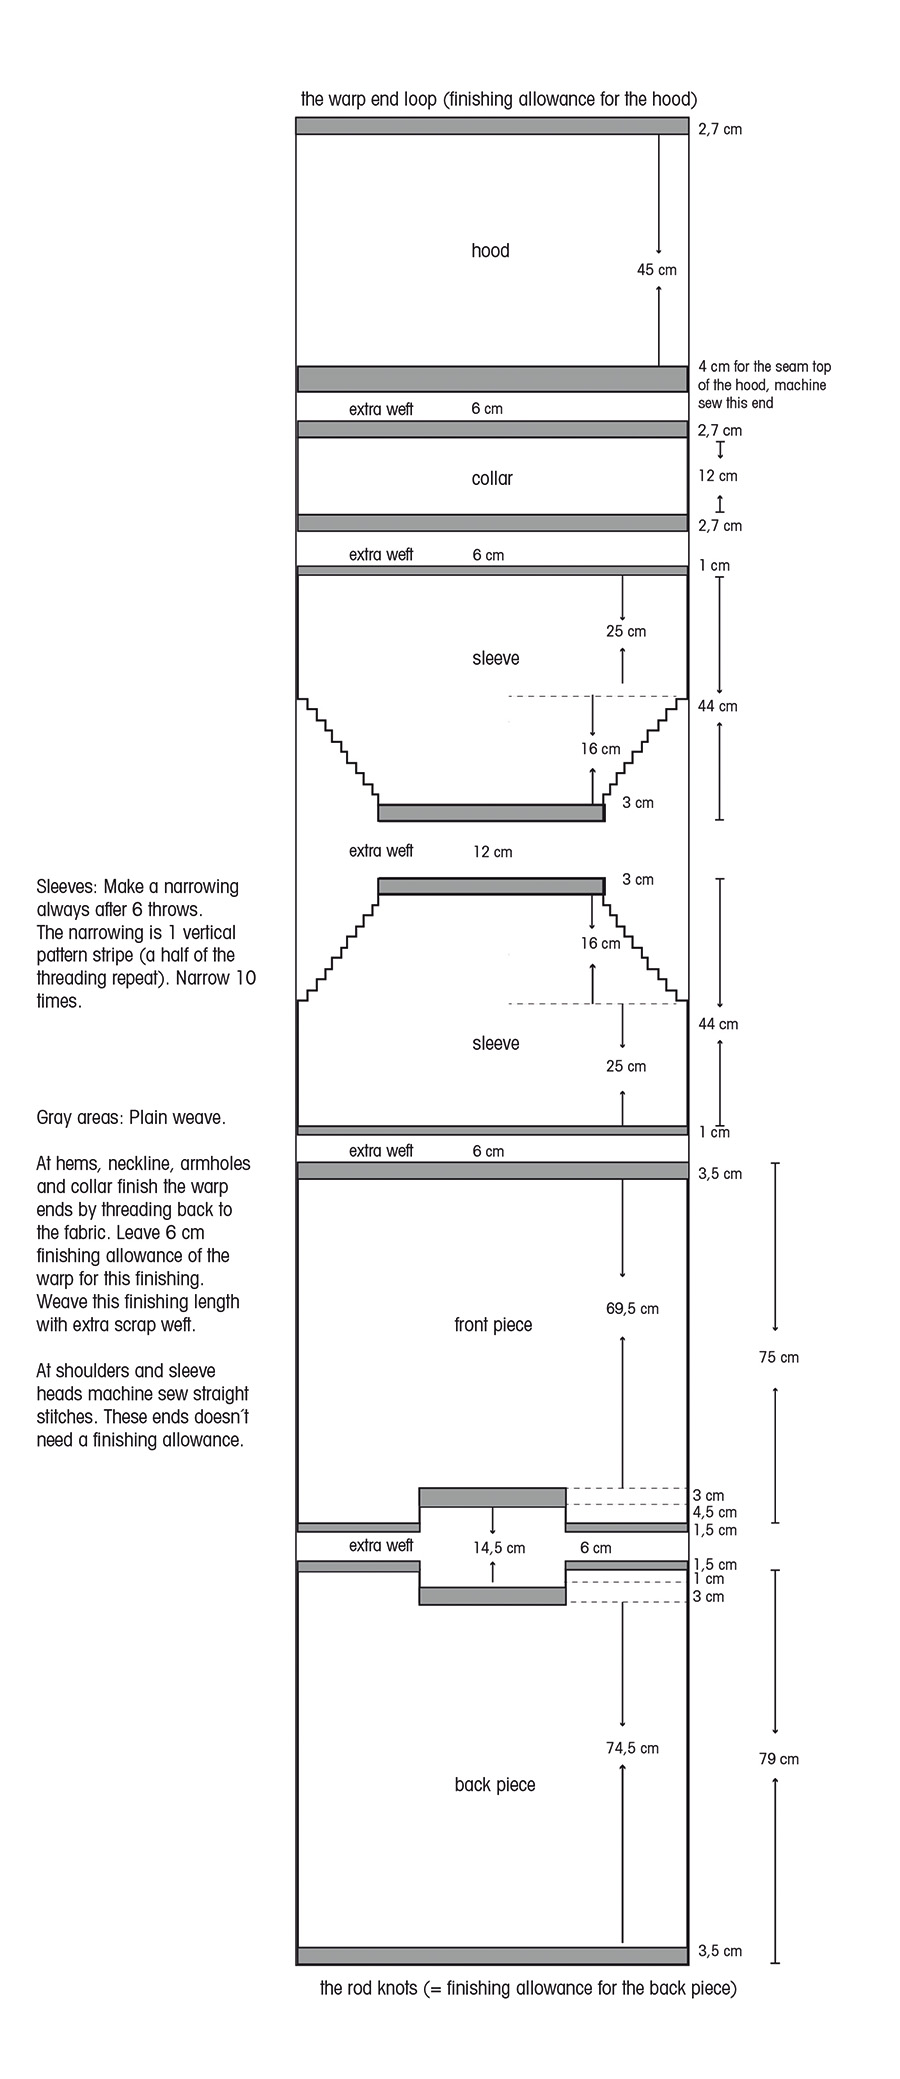

Weave a sample
* There are many types of wool yarns, and they act in different ways, even if they were same the weight. Weave a sample if you use some other yarn as in the instruction.
* Weave samples when you design your own fabric. Use various treadling and densities. Write everything down already during weaving!
* Measure the size of the samples before and after wet-finishing and calculate the shrinkage of the fabric. Please note that a narrow sample can shrink a little differently than a wide fabric. If you wish, you can also weave two samples with the same methods and wet-finish only the other.
* In the samples you can conveniently try different finishing methods.
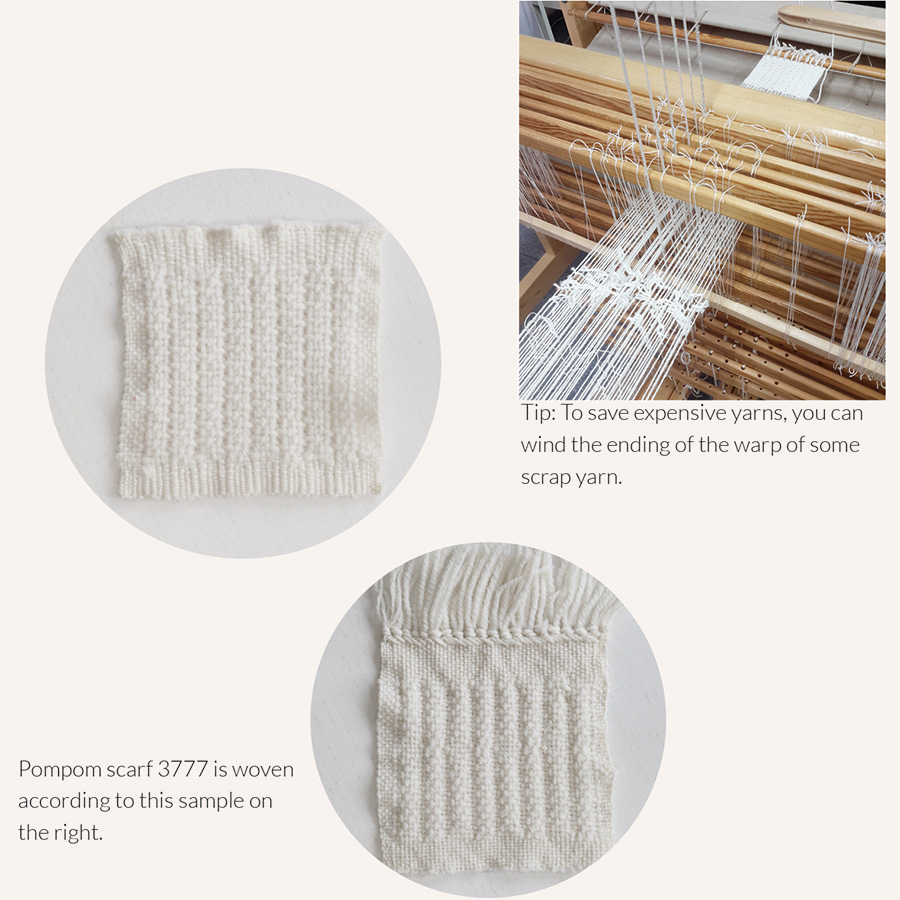
SWEATER FABRIC SAMPLES
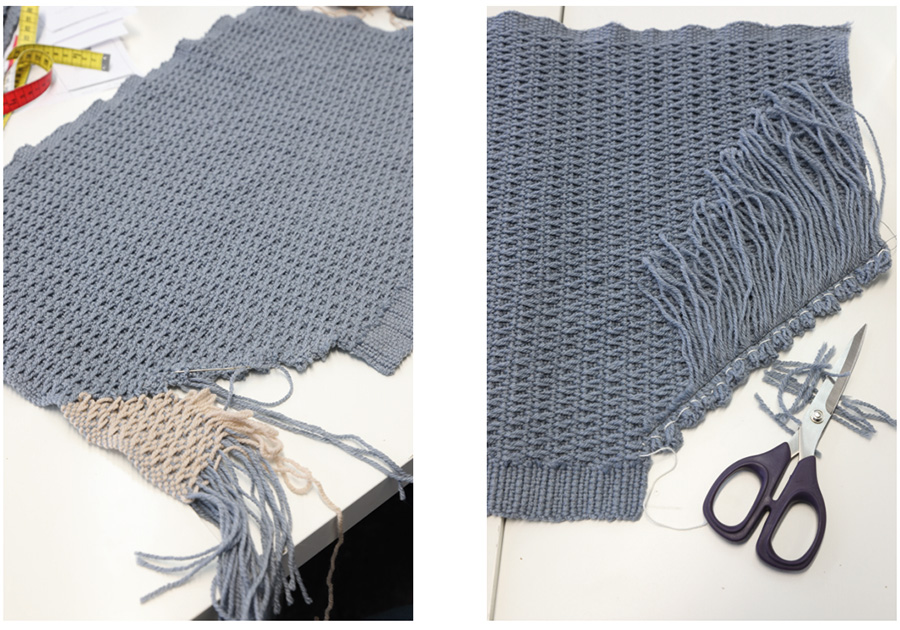
The folded hems of woven fabric are often thick, so we were worried about finishing. We added plain weave to the edges and tried to see if a thinner thread could be used on the edges and ends. We finished the samples with fringe, straight stitching, zigzag stitching and threading the warp ends back to the fabric.
After wet-finishing, we estimated that threading would be a good finishing method for the ends of the pieces and a straight stitch at the edges at the seams. A zigzag stitch stretched the edge, and the fringes didn’t inspire us. In the light brown sweater, we used thinner yarn, but from the blue sweater we left out the thin yarn and wove the whole fabric with the same weight yarn. We wove the sweaters with the treadling to make the fabric surface smoother.


